Schedule FIM 2010 with a sleep option

When scheduling your run profiles in FIM 2010 you sometimes needs to add a short sleep, to allow for the external system to process data. This can for example be required when the FIM Service needs to apply some workflow on the exported data before you import the result.

In this post I will show you one option to do so when using PowerShell script to run the profiles in FIM Synchronization Service.

The scripts I show you snippets of in this post can be downloaded here: ScheduleFIMwSleep.

DeltaRunWithSleep.ps1

I usually use a PowerShell script to schedule the typical run profiles.
In the script I allow for a special “profile” using the syntax “Sleep:X” to make the script sleep for X seconds.

@{
name="FIMService";
profilesToRun=@("Export";"Sleep:30";"Delta Import";"Delta Sync");
};

So whenever it finds this “Sleep” profile it will sleep instead of trying to run an actual run profile.

if($profileName.StartsWith("Sleep"))
{Start-Sleep -Seconds $profileName.Split(":")[1]}
else
{
$result = $MA.Execute($profileName);
if("success".Equals($result.ReturnValue)){} else {$msg = "Error: "+$result}
}

ReloadWithSleep.ps1

A special case of run schedule is when you need to do some kind of reload or initial load of data. This could be just because you deleted a connector space and need to reload or when changing configuration.
If you use this due to migrating or changing configuration you should be aware that you should always run Full Synchronization rather than Delta on all MA’s with configuration changes.
In this run profile I have added that it disables provisioning before running any run profiles and then enables it once it’s done.

#Disable Provisioning
& "$scriptpath/DisableProvisioning.ps1"

#Run Profiles
do {….}

#EnableProvisioning
& "$scriptpath/EnableProvisioning.ps1"

As you can see the actual enabling and disabling is made in two separate PowerShell scripts (EnableProvisioning.ps1 and DisableProvisioning.ps1) that need to reside in the same folder as the script calling.

Hopefully the information in this post makes your scheduling of FIM 2010 easier.

Using a CleanUp MA in FIM 2010

Every now and then a FIM administrator runs into having to do some cleanup in the MetaVerse in FIM. It could be things like deleting objects or “nulling” attributes.

In this post I will show you how you can use a CleanUp MA to assist you in this task. The example I use is to delete all group objects that are missing the accountName attribute.

There are several ways of creating the CleanUp MA. My approach is to use a SQL MA that uses a SQL view of the MetaVerse to filter the objects you would like to “Clean Up”.

WARNING! Before you continue make sure all schedules are turned off and that you make a new backup of the FIMSynchronizationService database.

First let’s create the SQL view. The table you use in the view is the mms_metaverse and the “required” attributes you should use is the object_id and object_type. Object_id is the one you use to join and object_type is for defining the object_type column in the SQL MA. You then add columns and filters as needed to define the objects in the MV that you need to work with. In this example I take group objects where accountName is missing.
CleanUpMA.SQL.View
Then create a simple SQL MA using the view and create a join rule using the object_id attribute.
CleanUpMA.SQL.MA
Configure run profiles for Full Import and Full Synchronization
CleanUpMA.RunProfiles
Run Full Import and Full Sync to join the objects in the CleanUp MA to the objects in the MV.
CleanUpMA.Join
In Metaverse Designer configure a new object deletion setting to delete group objects if they are disconnected from the CleanUp MA.
CleanUpMA.ObjDelRule
If you would like to propagate the deletion to another MA (or MA’s) you can temporary define the deprovisioning setting on that MA to delete objects when disconnected. In my example these groups has an error in the FIM Service MA since they lack the required accountName. These pending provisions will be deleted once the MV object is deleted.
CleanUpMA.FIMMAError
To fire off the deletion just delete the connector space of the CleanUp MA. This will now disconnect and delete the MV object and, in my case, the pending errors in the FIM Service MA.

When done, remember to reset the object deletion rule and deprovisioning settings you changed to its prior setting.
CleanUpMA.ObjDelRuleReset

The CleanUp MA can be kept for future needs. Just change the view as needed and do a Refresh Schema on the CleanUp MA to use it for other purposes when needed.

Building the FIM 2010 R2 SmsServiceProvider.dll

When using Self-Service Password Reset (SSPR) in FIM 2010 R2 it is a common request from my customers to use SMS OTP (One-Time Password) to authenticate the user trying to reset his password.

In one of my earlier posts, Automate SSPR registration in FIM 2010 R2, I described how you can automate the registration process. But in order to use SMS OTP you also need to build a small dll file. At Microsoft TechNet you can find an example on how to build the required SmsServiceProvider.dll.

The problem is that there is a “bug” in the FIM Service that makes it easy to build the dll in a way that does not work. The error you will run into is shown in the eventlog as “System.TypeLoadException: The custom SMS provider DLL does not implement the required interface.“.

The dll is required to have a class that implements the Microsoft.IdentityManagement.SmsServiceProvider.ISmsServiceProvider interface and that class should have a public method called SendSMS as seen in the code snippet below.

namespace XPServices.FIM.SmsServiceProvider
{
    using System;
    using System.Collections.Generic;
    using Microsoft.IdentityManagement.SmsServiceProvider;

    public class SmsServiceProvider : ISmsServiceProvider
    {
        public void SendSms(string mobileNumber, string message, Guid requestId, Dictionary<string, object> deliveryAttributes)
        {
            XPServices.FIM.mySMSProvider.SendSms(mobileNumber, message);
        }
    }
}

When the FIM Service looks at the dll it requires that the ISmsServiceProvider is the FIRST interface. If your SMS service provider uses for example a Web Service and you add the reference to that Web Service in your code it will likely show up first and the FIM Service will give you the error “System.TypeLoadException: The custom SMS provider DLL does not implement the required interface.

The solution is to move all logic and references into a separate class library. As you see in my code above all logic about how to send the SMS is moved into the XPServices.FIM.mySMSProvider class. This will hold the references to any Web Services and FIM Service will not have any trouble enumerating the SmsServiceProvider.dll since it only holds one class and one method. Below is a snippet showing parts of a typical class library in this scenario.

namespace XPServices.FIM
{
    public class mySMSProvider
    {
        static string id;
        static string password;

        public static string SendSms(string userMobileNumber, string message)…
        public static void GetSMSConfig()…
     }
}

When deploying this all we need to do is drop both dll’s in the FIM Service folder (default this is C:\Program Files\Microsoft Forefront Identity Manager\2010\Service\)

Redirect to IdentityManagement site in SPF 2013

It’s a common request, when starting to use the FIM 2010 Portal for self-service, to try to redirect the root url of the FIM portal to the IdentityManagement sub-site. If you have moved to SPF 2013 you will find that none of the methods available in easy to find documentation from Microsoft will work.

Using for example the IIS HTTP Redirect as suggested on the TechNet Wiki. Trying this will however mess-up your site since it will affect your CSS.

On the FIM TechNet site there is also a note close to the bottom of the Installing the FIM 2010 R2 Server Components page about “To redirect the FIM Portal”. This will not work either because SPF 2013 just ignores the default.aspx page.

So how should we do it?
After some investigation I found the clue to the solution in a SharePoint forum thread. The solution was presented by Per Jakobsen.

[EDIT 2018-12-13]
I now have a brand new solution to this problem… Please ignore old solution and use my new PowerShell script on Gist.

— old solution below–
This is how I have solved it.
Create a document using notepad and call it, for example, RedirectFIM.aspx. The file should have the following content.

<html>
<head>
<title>Redirect to IdentityManagement site</title>
<meta http-equiv="refresh" content="0; url=https://im.company.com/IdentityManagement/default.aspx" />
</head>
<body>
</body>
</html>

Upload this file as a new document to the Shared Documents library in SharePoint.
RedirectFIMUploaded
You can now try that it is working by clicking on it. You should be redirected to our familiar FIM homepage.
FIMHomePageAfterRedirect
When we know it is working we can set it as homepage for the site. Since this is a subsite we need to use PowerShell to do it.
Start the SharePoint 2013 Management Shell and configure the uploaded page as WelcomePage for the root site.

$w = Get-SPWeb https://im.company.com
$root = $w.RootFolder
$root.WelcomePage = "Shared%20Documents/RedirectFIM.aspx"
$root.Update()

If you now access the root site https://im.company.com you will end up being redirected to the IdentityManagement site. If you need to access the root site you can always use the old default home page at https://im.company.com/SitePages/Home.aspx

Using smart links in UAG 2010 might cause URL is to long error

When you start to use ADFS with your UAG and also start to use Azure or Office 365 you might come up with the idea of “publishing” your Office 365 SharePoint site in the UAG portal. This can be done using what is called a Smart Link.

But when you add your smart link as an application in your UAG you can easily end-up with breaking the UAG Portal and getting a URL is to long error message.
UAG-Error-URLIsToLong
This happens because you have associated your application with the federation URL by adding your ADFS server as the Web Server in your application.
UAG-Error-UsingSTSasWebServer
This is an easy misstake to make since the Smart Link starts with something like “https://sts.company.com/adfs/ls…”.

What you need to do is put a “dummy” value in the Web Server setting of the application. This value however needs to be resolvable to an IP address by UAG. One way of solving that is to put the “dummy” value in the hosts file of the UAG and put a “dummy” IP-address on it.
Now you can put the Smart Link URL as the Portal Link in your application and the UAG Portal now contains an application that in fact is hosted in Office 365 but still gives SSO due to ADFS authentication.

Managing Office 365 licenses using FIM 2010

When starting to use Office 365 in large scale you soon realize that although DirSync will solve most of your synchronization needs it will not solve the problem of assigning the correct license to different users. In this post I will show you how I solved this problem using FIM 2010 with a PowerShell MA.

The problem at hand was not only to license unlicensed users but to manage licenses in the respect of changing the license and removing the license based on information in FIM.

Background information

The customer has almost 60,000 users in FIM. In that we have 900 staff and a little over 57,000 students.

In FIM we use the employeeType attribute to decide the type of user. In this context we have three different values to consider, Staff, Student and Alumni. Each type should have a different license assigned to them. And since typically a Student will eventually become an Alumni we need to manage that transformation as well.

In FIM we have also created a simple boolean attribute called off365Licensed. This attribute is the main “switch” to decide if you should have a license at all.

Office 365 Licenses

Different subscriptions in Office 365 gives you different licenses to work with so keep in mind that this post only shows one type of subscription. The EDU subscription gives you a couple of “free” licenses to use but in order to use them we need to learn how they look since we actually will need to disable parts of some licenses in most cases.

As an example I will show you the Faculty licenses that are “free”.
You have the STANDARDWOFFPACK_FACULTY and also the PROJECTONLINE_PLAN_1_FACULTY.

But they consist of different parts.
The STANDARDWOFFPACK_FACULTY has four parts in it

  • SHAREPOINTWAC_EDU
  • MCOSTANDARD
  • SHAREPOINTSTANDARD_EDU
  • EXCHANGE_S_STANDARD

The PROJECTONLINE_PLAN_1_FACULTY has three parts in it

  • SHAREPOINT_PROJECT_EDU
  • SHAREPOINTWAC_EDU
  • SHAREPOINTENTERPRISE_EDU

The problem here is that they overlap and both contain SharePoint licenses that cannot be assigned at the same time. So in our scripts we need to disable parts of the licenses that we cannot assign if we also want to assign the other.

PowerShell MA

We decided to use the PowerShell MA developed by Sören Granfeldt.
I do not do Provisioning and De-provisioning in this case, that part I leave to DirSync. In this MA we import the users, join them to the corresponding user in the MetaVerse and then make sure the correct license is assigned.

Below I show you some parts of the scripts involved but please download O365MAScripts to get the complete scripts.
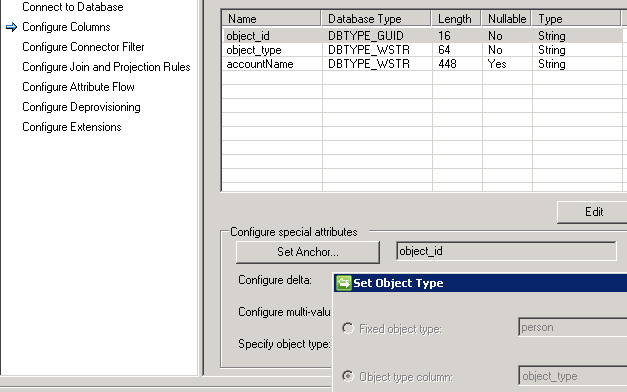
Schema

The Schema script in this case is quite simple. I used the UPN as anchor in this case.

$obj = New-Object -Type PSCustomObject
$obj | Add-Member -Type NoteProperty -Name "Anchor-UPN|String" -Value 1
$obj | Add-Member -Type NoteProperty -Name "objectClass|String" -Value "user"
$Obj | Add-Member -Type NoteProperty -Name 'IsLicensed|Boolean' -Value $true
$Obj | Add-Member -Type NoteProperty -Name 'LicenseType|String' -Value "Staff"
$obj

Import Script

The import script imports the current MsolUsers

$Users = Get-MsolUser -MaxResults 50000 -DomainName company.com

but also checks the current license assigned

if($user.IsLicensed)
{
if($User.Licenses.AccountSkuId[0].EndsWith("FACULTY"))
{$obj.Add("LicenseType", "Staff")}
elseif($User.Licenses.AccountSkuId[0].EndsWith("STUDENT"))
{$obj.Add("LicenseType", "Student")}
elseif($User.Licenses.AccountSkuId[0].EndsWith("ALUMNI"))
{$obj.Add("LicenseType", "Alumni")}
else {$obj.Add("LicenseType", "Unknown")}
}

Export

The export script picks up the users from O365

$msoluser=Get-MsolUser -UserPrincipalName $_.DN
$IsLicensed=$msoluser.IsLicensed

I do not bother to look at the current license of the users since changing licenses involves removing the old license and adding the new license. My script just removes the old licenses and assigns the correct ones.
Removing old licenses can be done in a single line

Set-MsolUserLicense -UserPrincipalName $msolUser.UserPrincipalName -RemoveLicenses $msoluser.Licenses.AccountSkuId

Adding the correct license involves defining the licenses including the excludes discussed earlier in this post.
Please note that before we can assign any licenses we need to set the UsageLocation on the user.

if(!$msoluser.UsageLocation)
{Set-MsolUser -UserPrincipalName $msolUser.UserPrincipalName -UsageLocation $DefaultUsageLocation;}

We then assign the license depending on the employeeType in FIM.

if($LicenseType -eq "Staff")
{
Set-MsolUserLicense -UserPrincipalName $msolUser.UserPrincipalName -AddLicenses $STANDARDWOFFPACK_FACULTY -LicenseOptions $FacultyStnd;
Set-MsolUserLicense -UserPrincipalName $msolUser.UserPrincipalName -AddLicenses $PROJECTONLINE_PLAN_1_FACULTY;
}
elseif($LicenseType -eq "Student")
{
Set-MsolUserLicense -UserPrincipalName $msolUser.UserPrincipalName -AddLicenses $STANDARDWOFFPACK_STUDENT -LicenseOptions $StudStnd;
Set-MsolUserLicense -UserPrincipalName $msolUser.UserPrincipalName -AddLicenses $PROJECTONLINE_PLAN_1_STUDENT;
}
elseif($LicenseType -eq "Alumni")
{
Set-MsolUserLicense -UserPrincipalName $msolUser.UserPrincipalName -AddLicenses $EXCHANGESTANDARD_ALUMNI;
}
else
{
throw "Unknown LicenseType"
}

Synchronization Rule

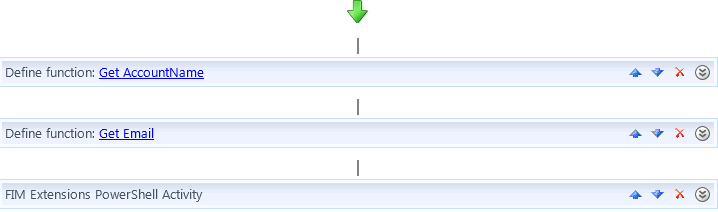
Finally we need to configure the Outbound Synchronization rule. We need two flows and I need a condition on the LicenseType to only set in on Licensed users.

O365 MA Outbound Synchronization Rule

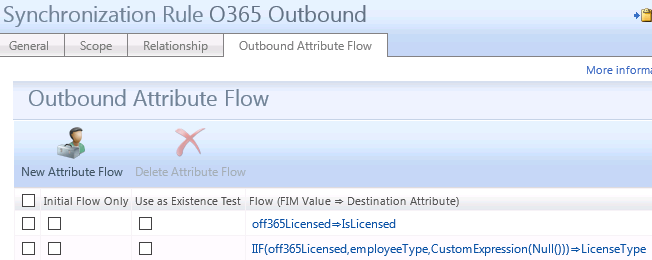
Office 365 Management Agent Outbound Synchronization Rule

Conclusion

In this post I have showed you one example on how to manage Office 365 licenses. As you can imagine this task can grow substantially if we also were to manage individually selectable licenses in some way. We have discussed this at this particular client, using the FIM portal for self-service to add additional licenses. That would off course require some major changes to current license management.

Managing Primary Group using FIM 2010

When working with educational customers a typical AD group i Students. This group however might contain hundreds of thousands of users, making it hard to manage. One solution is to make the Students group the primary group for the students. In this post I will show you one way of managing this using FIM 2010 R2.

The Primary Group in AD is stored in the attribute primaryGroupID as an integer. The value is the RID (Relative Identifier) of the group in AD. When you create a new user in AD this value becomes 513, which correspond to the Domain Users group. We cannot set this to any other value during provisioning, so we need to change it after provisioning is completed. If you look at the group in AD you will find that the value we are looking for is the last part of the objectSID.
DomainUsersSID
A thing to remember about the primary group is that if you look at the group itself the user is not listed in the members attribute once the group is configured as the primary group. But if you change the primaryGroupID the user is set as member in the previous primary group.

Now let’s see how we handle this in FIM.
We already have the Students group using some membership criteria.
StudentsBeforePrimary
The group needs to be created and provisioned to AD in order for us to be able to record the primaryGroupID for this particular group. In the picture below you can see my group got the ID 1204.
StudentsSID
You can also get the value using PowerShell.

$group = Get-ADGroup "Students"
$groupSid = $group.SID
[int]$GroupID = $groupSid.Value.Substring($groupSid.Value.LastIndexOf("-")+1)

We need to add the primaryGroupID to the attributes in the AD MA.
Import the current value into a new MV attribute called, for example, primaryGroupID (Number).
If you are using dynamic groups like I always try to do, you also need to add the attribute to the FIM Service schema. Allowing Sync to manage it and allow it in Filters.

Once the primaryGroupID is set in Active Directory the user will no longer show up in the members attribute. So FIM will try to add them again, failing with an error about existing object.
ErrorWhenAddingPrimaryGroupMember
We therefor need to modify the criteria so that it no longer contains the users which have been configured to have it as primary group.
StudentsAfterPrimary
The outbound synchronization rule could then look something like.
IIF(IsPresent(primaryGroupID),1204,Null())
where “1204” is the primaryGroupID of the new group.

Once the account is created and the new primaryGroupID has been set we can run this clean-up activity to remove them from the Domain Users group, if that is desired.

Get-ADUser -SearchBase "OU=Students,DC=ad,DC=company,DC=com" -Filter {primaryGroupID -ne 513} | ForEach-Object{Remove-ADGroupMember "Domain Users" -Members $_}

Automate SSPR registration in FIM 2010 R2

Since customers started using the OTP (One Time Password) authentication for SSPR (Self-Service Password Reset) I’ve had several discussions if registration should be manual or automatic. In a recent case the decision was that an external system was to be master for the email used for OTP based authentication. I then needed to configure FIM to automate this task. In this post I will show you how I did this in this particular case and hopefully it will give you some ideas on how to solve your own automatic registration.

Workflow

The registration management is made as an action Workflow in FIM. I decided to use the PowerShell Workflow Activity you can find on CodePlex. The workflow adds two parameters AccountName and Email before calling the PowerShell activity. This was a single-domain environment. If you have multiple domains just add the domain as a workflow attribute the same way and modify the script below accordingly.
SSPRAutoRegistrationWF
The Workflow data is using the built-in Function Evaluator activity.
GetOTPEmail
Before you can start using the PowerShell activity there are two things you need to configure.

  • The FIM Service account will do the request and needs to be defined as user in FIM and this user needs to be in the Administrators Set in order to perform the registration actions.
  • The FIM Service configuration file (Microsoft.ResourceManagement.Service.exe.config) needs to be updated. The
    <resourceManagementClient resourceManagementServiceBaseAddress="localhost" />

    needs to be changed to have the full URL of the FIM Service. Something like

    <resourceManagementClient resourceManagementServiceBaseAddress="http://fimserver:5725" />

Finally we need to have the script that we use in our PowerShell activity. This example uses the email workflow data to decide if registration or unregistration should happen. NOTE! Due to some wordpress issue the backslash between the $Domain and the $AccountName is stripped. Remember to add it before using this script or download it here.

Add-PSSnapin FIMAutomation
$AccountName = $fimwf.WorkflowDictionary.AccountName
$Email = $fimwf.WorkflowDictionary.Email
$Domain = "AD"
if($Email)
{
$template = Get-AuthenticationWorkflowRegistrationTemplate -AuthenticationWorkflowName 'Password Reset Email OTP AuthN Workflow'
$template.GateRegistrationTemplates[0].Data[0].Value = $Email
Register-AuthenticationWorkflow -UserName "$Domain$AccountName" -AuthenticationWorkflowRegistrationTemplate $template
}
else
{
Unregister-AuthenticationWorkflow -UserName "$Domain$AccountName" -AuthenticationWorkflowName 'Password Reset Email OTP AuthN Workflow'
}

Synchronization Rules

I extended the Synchronization Service schema with a new attribute called OTPEmail.
The external system had an attribute controlling the status of the user. Using the status as a criteria I ended up with this inbound flow.
IIF(Enabled,extEMailAddress,Null()) -> OTPEmail
on the FIM Service MA I added the flow
msidmOneTimePasswordEmailAddress <- OTPEmail
NOTE! Requires that the msidmOneTimePasswordEmailAddress attribute is added to the MPR allowing the Synchronization Account to manage Users.

MPR (Management Policy Rule)

The last thing was to solve how to trigger the workflow. I initially was thinking about using a Set transition MPR but decideed to go for a Request MPR. This MPR will fire of the workflow whenever the OTP email address is changed. This is one way of detecting the inactivation of the user in the external system that will clear the OTPEmail attribute in the MV according to the sync rule above.
The MPR has the following properties.

  • Name: Update SSPR Registration if OTP Email is changed.
  • Type: Request
  • Requestor: All People
  • Operation: Modify a single-valued attribute
  • Target: Password Reset Users using Email OTP
  • Target Attribute: One-Time Password Email Address

Create FIM 2010 CM service accounts using PowerShell

During a recent customer case I created a small PowerShell script that creates all the service accounts used by FIM 2010 CM and configures the required SPN and delegation for Kerberos to work.

In the script just replace the initial parameters with your own before running it.
The script will prompt for the password to use for each of the accounts as it runs.
You can also download the script here.

#Script needs to run as domain admin on computer with AD DS Admin Tools.
$FIMCMUPNDomain = "ad.company.com"
$IssuingCA = "ca01"
$OU = "OU=ServiceAccounts,DC=ad,DC=company,DC=com"
$FIMCMPortalHostname = "cm.company.com"
$FIMCMPool = "svcFIMCMPool"
$FIMCMAgent = "svcFIMCMAgent"
$FIMCMEnrollAgent = "svcFIMCMEnrollAgent"
$FIMCMKRAgent = "svcFIMCMKRAgent"
$FIMCMAuthZAgent = "svcFIMCMAuthZAgent"
$FIMCMCAMngr = "svcFIMCMCAMngr"
$FIMCMService = "svcFIMCMService"

#FIM CM Pool
New-ADUser $FIMCMPool -SamAccountName  $FIMCMPool -GivenName FIMCM -Surname Pool -DisplayName "FIM CM Pool" -UserPrincipalName $FIMCMPool@$FIMCMUPNDomain -Path $OU -Description  "Application pool account for FIM CM Portal, cm.company.com" -AccountPassword (Read-Host -AsSecureString "$FIMCMPool Password") -ChangePasswordAtLogon $false -PasswordNeverExpires $true -Enabled  $true

#Kerberos settings
#SPN
SETSPN -S http/$FIMCMPortalHostname $FIMCMPool
#Delegation for rpcss/issuingca
Get-ADUser $FIMCMPool| Set-ADObject -Add @{"msDS-AllowedToDelegateTo"="rpcss/$IssuingCA","rpcss/$IssuingCA.$FIMCMUPNDomain"}

#FIM CM Agent.
New-ADUser $FIMCMAgent -SamAccountName $FIMCMAgent -GivenName FIMCM -Surname Agent -DisplayName "FIM CM Agent" -UserPrincipalName $FIMCMAgent@$FIMCMUPNDomain -Path $OU -Description  "FIM CM Agent account" -AccountPassword (Read-Host -AsSecureString "$FIMCMAgent Password") -ChangePasswordAtLogon $false -PasswordNeverExpires $true -Enabled  $true

#FIM CM Enrollment Agent
New-ADUser $FIMCMEnrollAgent -SamAccountName $FIMCMEnrollAgent -GivenName FIMCM -Surname EnrollAgent -DisplayName "FIM CM Enroll Agent" -UserPrincipalName $FIMCMEnrollAgent@$FIMCMUPNDomain -Path $OU -Description "FIM CM Enrollment Agent account" -AccountPassword (Read-Host -AsSecureString "$FIMCMEnrollAgent Password") -ChangePasswordAtLogon $false -PasswordNeverExpires $true -Enabled  $true

#FIM CM Key Recovery Agent
New-ADUser $FIMCMKRAgent -SamAccountName $FIMCMKRAgent -GivenName FIMCM -Surname KRAgent -DisplayName "FIM CM KR Agent" -UserPrincipalName $FIMCMKRAgent@$FIMCMUPNDomain -Path $OU -Description "FIM CM Key Recovery Agent account" -AccountPassword (Read-Host -AsSecureString "$FIMCMKRAgent Password") -ChangePasswordAtLogon $false -PasswordNeverExpires $true -Enabled  $true

#FIM CM Authorization Agent
New-ADUser $FIMCMAuthZAgent -SamAccountName $FIMCMAuthZAgent -GivenName FIMCM -Surname AuthZAgent -DisplayName "FIM CM AuthZ Agent" -UserPrincipalName $FIMCMAuthZAgent@$FIMCMUPNDomain -Path $OU -Description "FIM CM Authorization Agent account" -AccountPassword (Read-Host -AsSecureString "$FIMCMAuthZAgent Password") -ChangePasswordAtLogon $false -PasswordNeverExpires $true -Enabled  $true

#FIM CM CA Manager account
New-ADUser $FIMCMCAMngr -SamAccountName $FIMCMCAMngr -GivenName FIMCM -Surname CAMngr -DisplayName "FIM CM CA Mngr" -UserPrincipalName $FIMCMCAMngr@$FIMCMUPNDomain -Path $OU -Description "FIM CM CA Manager account" -AccountPassword (Read-Host -AsSecureString "$FIMCMCAMngr Password") -ChangePasswordAtLogon $false -PasswordNeverExpires $true -Enabled  $true

#FIM CM Service account
New-ADUser $FIMCMService -SamAccountName $FIMCMService -GivenName FIMCM -Surname Service -DisplayName "FIM CM Service" -UserPrincipalName $FIMCMService@$FIMCMUPNDomain -Path $OU -Description "FIM CM Service account" -AccountPassword (Read-Host -AsSecureString "$FIMCMService Password") -ChangePasswordAtLogon $false -PasswordNeverExpires $true -Enabled  $true

UAG 2010 unable to activate after removing DirectAccess

Many customers that used UAG 2010 for DirectAccess is in the process of replacing it with DirectAccess in Windows Server 2012 (or 2012 R2). One issue with this is that once UAG has been your DA server it has a hard time forgetting it.

Today I stumbled upon such a case. UAG had not been used for DA for 6 months and DirectAccess had been disabled following the official TechNet article on how to disable and enable DA in UAG.

Now however they started to clean-up some more. Removing the IP-HTTPS certificate and the IP addresses used by DA in UAG. When they did UAG failed to activate the DirectAccess configuration!

The solution to this problem is to remove a small file on the UAG server that holds information about the DA IP addresses and certificates. The file you need to remove is the uagda.config file located in the common\conf folder of your UAG installation.

After deleting the file your UAG should activate just fine again.