Migrating CLM to FIM CM

How to upgrade/migrate from CLM to FIM is totally undocumented by Microsoft. In this article I will tell you what I have learned about this process during my latest customer projects.

First of all we need to state a fact.
There is no way to upgrade from CLM to FIM, you migrate!
This official answer can be read at the FIM FAQ. “Upgrading from CLM to FIM CM is not supported because CLM Feature Pack (FP1) is supported only on 32-bit platforms and FIM CM is only supported on 64-bit platforms. You can export the CLM 2007 database and re-use it in a new FIM CM deployment

The Process
The basic steps involved in the migration are as follows, later in this article i will tell you the details involved in each step.

  • Move the CLM DB to a new FIM supported SQL
  • Upgrade the DB to FIM Schema
  • Install FIM
  • Run the configuration wizard in FIM and use existing DB and Certs
  • Migrate certificates used by CLM services, to FIM
  • Migrate configuration from CLM to FIM
  • Upgrade the CA modules to FIM version
  • Configure CA modules

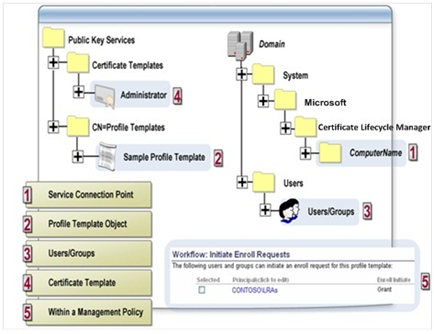
One thing we need to remember is the fact that CLM and FIM CM basically are the same. And both use the same permission and configuration modell described in the picture below.

FIM CM Permissions

FIM CM Permissions

The permissions are in detail described in Configuring FIM CM Groups, Templates, and Permissions. If we re-use the Service Accounts used by CLM in our FIM CM setup we will be able to re-use the configuration as well in great parts.

Let us now look at the different steps involved and some details around them as well.

Move the CLM DB to a new FIM supported SQL
This is a task for the DB admin. Backup the CLM database using standard SQL backup methods and then restore the Database on a 64-bit SQL 2008, supported by FIM CM.
If you have FIM 2010 Update 1 (build 4.0.3531.2), SQL 2008 R2 is also supported.
I would suggest that you use the same name on the Database as you did before, to minimize the configuration changes required during the migration.

Uppgrade the DB to FIM Schema
On the FIM CM installation media in the folder Certificate Managementx64Upgrade you will find the scripts required to upgrade the database. You run the upgrade.bat with the “new” SQL servername as parameter. Please note that this command needs to be executed on a machine where SQL client software (osql) is installed.

Install FIM
Before you can start the installation you need to make sure the machine has the required prerequisites as described in Installation Requirements, basically the only important stuff is in the section Prepare IIS 7 for FIM CM. We also need to make sure the CLMService account has the correct rights both locally and on the DB. This is described in Configuring the FIM CM Service.

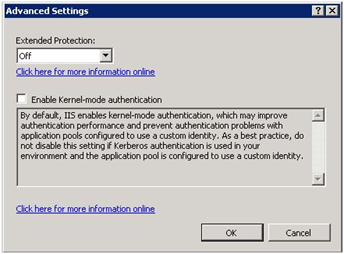
Usually FIM CM setup is split-up to at least 3 servers. FIM CM, SQL and CA. This also gives you some trouble with KCD (Kerberos Constrained Delegation). First of all you need to disable Kernel-mode authentication in IIS, to make sure that FIM CM can use it’s service accounts the way we want them to.

IIS 7 Kernel mode Authentication

IIS 7 Kernel mode Authentication

To disable Kernel-mode authentication open the IIS manager and navigate to Default Website. Select Authentication (it’s in the IIS section) in the middle pane, and select Advanced Settings in the taskbar on the right side.Uncheck Enable Kernel-mode authentication

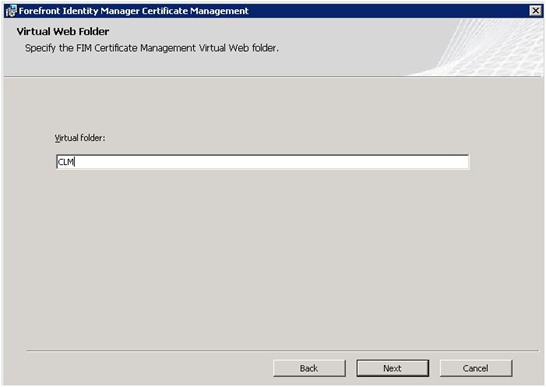
Installing FIM is no problem, the only setting during the setup you might need to think about is the name of the Virtual Folder in IIS.

FIM CM VirtualFolder

FIM CM VirtualFolder

By choosing the old name, CLM, instead of the default CertificateManagement, user favorites and systems pointing to the CLM folder will not need to be changed. For that reason you might also consider re-using the old DNS alias and point it to the new FIM CM server, if not you will also need to check your SPN’s and re-check all KCD settings.

Run the configuration wizard in FIM and use existing DB and Certs
Make sure you upgraded the DB before you run the configuration wizard. The wizard is basically the same as the one in CLM and i will only point out some places in the wizard where you need to pay extra attention.

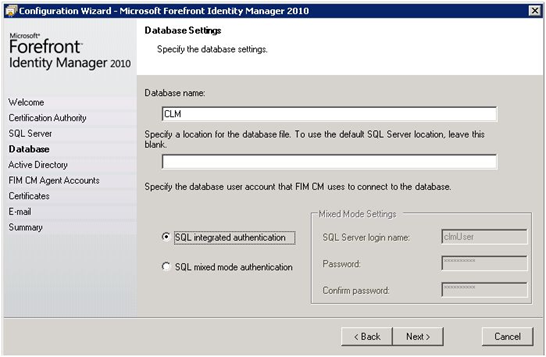
FIM Configuration Wizard DB Name

FIM Configuration Wizard DB Name

The Database name should be CLM since we are reusing the old database.

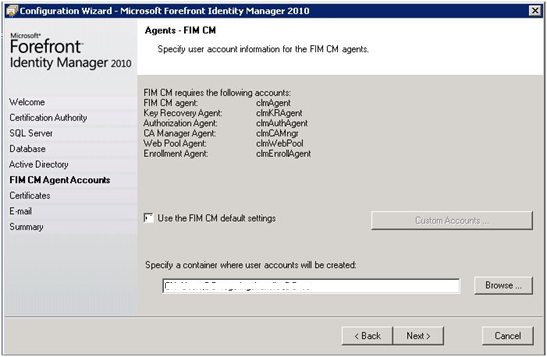
FIM Config Wizard Custom Agent Accounts

FIM Config Wizard Custom Agent Accounts

When specifying agent accounts UNCHECK Use the FIM CM default settings and click Custom Accounts… button.

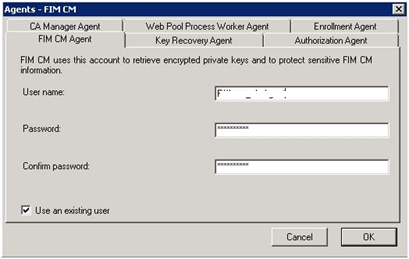
FIM Config Wizard Agents Account Settings

FIM Config Wizard Agents Account Settings

For each agent account configure the username and password and CHECK Use an existing user

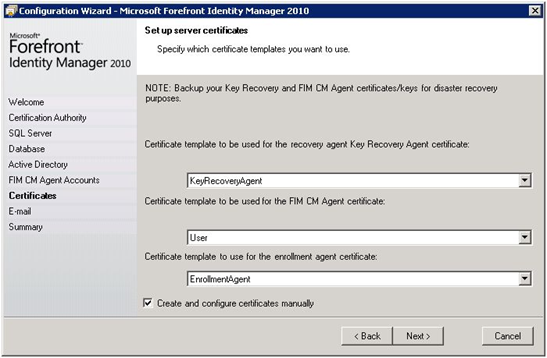
FIM Config Wizard Certificates

FIM Config Wizard Certificates

Since we will re-use the same accounts and certifcates. CHECK Create and configure certificates manually.

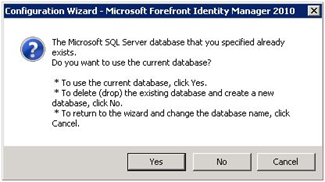
FIM Config Wizard Use Existing DB

FIM Config Wizard Use Existing DB

At the end of the wizard you should be notified that the database already exists. Make sure you answer YES to use the existing DB.

Migrate certificates used by CLM services, to FIM
You need to migrate the certificates used by CLM service accounts to the new FIM CM Server.

The 3 accounts you need to migrate the certificates for are listed below. If you have changed the accounts used in your CLM deployment you need to adjust to that.

  • CLMKRAgent
  • CLMEnrollAgent
  • CLMAgent.

Export the certificates to pfx files from CLM and then log on as each service account and import the certificates into the personal store. Don’t forget the private keys during export/import.

Migrate configuration from CLM to FIM
There are multiple configurations you need to migrate.

First you have the SCP (Service Connection Point) created by the configuration wizard. Check the permissions you have on the old SCP and configure the new SCP with the same settings.

Then you have the config-files. One approach might be to copy all config files from the old CLM to FIM, but I have in my cases migrated the settings in the files instead, since there is no support statement from Microsoft to copy it. This means taking the time to compare the files and copy the changes. In a simple setup the only config file you need to look at is the web.config. In my customer cases I have found that the following keys of the web.config file might have changes.

  • Clm.MaxRecords
  • Clm.Report.MaxRecords
  • Clm.ValidSigningCertificates.Hashes
  • Clm.EnrollAgent.Certificate.Hash
  • Clm.SmartCard.ExchangeCertificate.Hash
  • Clm.RequestSecurity.Flags
  • Clm.RequestSecurity.Groups

Since we are re-using the accounts and the database we do not need to make any changes to certificate templates, profile templates or management policies.

Upgrade the CA modules to FIM version
Before we can start using FIM CM we need to upgrade the CA module on the issuing CA used by CLM. Depending on the OS used by the CA you might need to add .NET Framework 3.5 SP1 before installing the FIM CM CA module.

During the upgrade, the CA module will “loose” it’s settings, so before you run the setup make sure you know the settings you would like to use for database connection string and signing certificate.

Configure CA modules

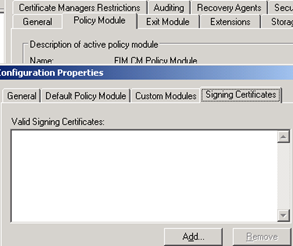
FIM CA Module Signing Certificate

FIM CA Module Signing Certificate

Two setting are required to be added for the FIM CM CA module before you can use it. First it is the database connection string in the Exit Module and then it is the signing certificate in the Policy Module.

Hopefully this article has made it a little bit easier for you to understand the steps involved in migrating from CLM to FIM CM. If you have anything to add to this guide please comment.
Issues when Migrating from ISA to TMG

Migrating from ISA to TMG is in some case quite easy, but in others it can be quite a jurney. In one of my latest cases it was indeed an interesting jurney…

So let me share some findings with you.

Moving from Standalone ISA to TMG Array.
This does not look to be a problem in theory, but…
Things you can do in a standalone ISA are sometimes not possible in a cluster.
This time it was the use of multiple subnets on a single nic. When moving to NLB you cannot have a VIP from a different subnet.
Found this out when i entered the scene day 1… And this caused the project also needing to do some IP-routing changes in the network.

Migrating Rules
Even though it is possible to export/import configurations in some scenarios. You usually want to take the opportunity to change the rules to take advantage of new features in TMG and also to clean up in the “mess” after adding rules over the years. While doing this kind of migration I have discovered many times that customer tells you one thing and the rules show something else.
You ask the cu…
“Have you made any special settings that we need to consider?”, and cu will answer “No”.
Well what you find in the rules is that a lot of them have “special non-default settings”. And when do you find this out… When users start testing! A little bit to late in other words.
The problem is that it is not a trivial task to check 100 rules in detail in order to grasp how many places have “special settings”.

Active FTP
This cu had a few FTP rules in place. They already knew which ones needed to be cleared from the “Read-Only” flag. They had learned that the hard way in ISA. But they did not know if they also required “Active FTP”. In a TMG cluster you need to “enable” Active FTP on first the enterprise level… And also on the Array level.

NLB and Procurve – Not the best combination

Using NLB to build TMG (or UAG) clusters is heavily dependent on switches used. HP Procurve has shown to not being “up to the job” in many cases.

After spending the last days helping a customer Migrate from ISA to TMG and trying to figure out how to get NLB to work in their environment I thought i should share some findings.

Unicast or Multicast
It is important to remember that TMG does not care if you use Uni- or Multicast. This is entirely a switch problem. Problem is that many network guys do not know how to pick the right one for the specific switch model at hand.

NLB in Procurve
When using typical Procurve switches (like 2800-series) you will find yourself stuck on using Unicast NLB and also having to add some static MAC-address entries in the environment.

When trying to use Multicast NLB we discovered that HP switches will not let you add Multicast MAC-addresses as static entry’s in many models.

One thing that i noted in this project is total lack of information from HP on how to integrate NLB with there different models.

Why NLB?
Many of you might say… Stop using NLB and get a HW LB instead…
In my opinion NLB should always be the first load balancing you should consider when building TMG and UAG clusters.

Why?… Simply because this is the one integrated into the product. If using any other LB you will not benefit from TMG’s integrated management. Configuring a stand-alone LB to detect service failures in TMG to cause a node-drop is not an easy task. I have also found that when using external LB you will in many cases not be able to use routed relations and will have some serious problems to get bi-directional affinity to work, especially in protocols like RPC.

Security or Performance

Just spent a day last week with one of Swedens largest Universities. I was talking about TMG.
What struck me was that the main problem they had with TMG was that it was reducing their bandwidth!

I find it quite strange to still here customers talking about Firewalls in terms of bandwidth rather then about the security and protection they add to their infrastructure.

New Times…

It is a new year with new opportunities.

I have now moved my blog back home and will try to increase my activities in helping the community around security and identity questions.

Over the last year social networks has also become more important in the work of getting in touch with customers and friends. Because of this, we (Me and Marcus) has decided to open up XP Services on Facebook.

Stay tuned for more and hopefully more frequent news…

ISA 2006 SP1 – Released

Finally, it’s here…. ISA 2006 SP1 was released last night.

You find it at http://www.microsoft.com/downloads/details.aspx?FamilyId=D2FECA6D-81D7-430A-9B2D-B070A5F6AE50&displaylang=en

Please read other blogposts here and also at http://blogs.technet.com/isablog/archive/2008/05/23/isa-server-2006-service-pack-1-features.aspx for information on all the new stuff in SP1.

Enjoy!

ISA 2006 and SAN Certificates

Many customers and others have been confused by the well spread rumor that ISA 2006 do not support SAN certificates like the ones used by Exchange 2007.

The confusion is often caused by the fact that they do not understand how ISA is using SSL bridging in a typical Exchange Publishing scenario.

You have to remember that SSL bridging means that there are TWO (2) separate SSL sessions going on.

Session 1: From the Client (usually on the Internet) to ISA
In this case the certificate shown by ISA is validated by the client and must satisfy the demands the client has, if no warning is to appear. If the client supports SAN certificates then you can have a SAN certificate in the ISA listener.

Session 2: From ISA to the published server (usually on the Internal network)
In this case the certificate shown by the published server needs to satisfy ISA (the original client has nothing to do with this). This means it has to be issued by a trusted CA and have a Common Name that matches the hostname on the “To” tab in the publishing rule. If this is a SAN certificate, the first SAN also needs to be the same name as the name used on the “To” tab in the publishing rule.

To summarize, ISA 2006 do support SAN certificates, but when acting as a client it can only validate the common name and the first SAN entry. This will change in SP1 (released later this summer), with SP1 ISA will as a client be able to validate any SAN entry to match the “To” used in the publishing rule.

The “great” Jim Harrison, has described this in more detail in his blog at http://blogs.technet.com/isablog/archive/2007/08/29/certificates-with-multiple-san-entries-may-break-isa-server-web-publishing.aspx

ISA 2006 SP1 – Traffic Simulator

One of the new interesting features of SP1 is the Traffic Simulator.

Using the Traffic Simulator you will be able to try out your rules to see if they match your intentions.

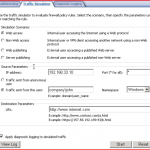
The Traffic Simulator is a new tab in the Troubleshooting node.

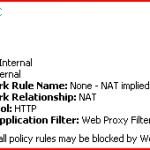
TrafficSimulator_Overview

The way it works is that it “injects” the scenario into the actual engine, and therefore we can only run the simulations on a server where firewall service is running. So it’s not possible to do this remote.

The result is in my opinion still a bit “short”. It simply states the result and show the rule causing the result. If I for example have a rule that requires authentication to access internet. The results will be.

1: Traffic sent from this user:

TrafficSimulator_Allow

2: Traffic sent from anonymous user:

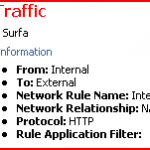
TrafficSimulator_AuthenticationRequirement

And as you can see the information you get from the denied is only that it got stuck on the rule, but it is so far up to you to realize that it is because of authentication requirements. I have filed a change request for more info in this case, hopefully it will make it into RTM.

In all this is yet another great new feature of SP1 that i believe many customers have wanted for some time.

ISA 2006 SP1 – NEW Features

To give you all a quick overview of the new features in ISA 2006 SP1 here is a quick list. I will cover some the features in more detail in some upcoming articles. As always, since this is a beta everything is subject to change, so let’s say this is features we are “likely” to see.

When it comes to release date for SP1, the official timeframe is “late summer 2008”. And since this is built in Israel where the summer never ends (compared to here in Sweden)… Who knows how long this summer will be…I hope it will be the shortest summer in mankind so that SP1 becomes available to all of you a.s.a.p.

The list below is not ordered in any way just a list, but WHAT A LIST!!!!

1. Configuration Change Tracking Registers all configuration changes applied to ISA Server configuration to help you assess issues that may occur as a result of these changes
2. Test Button Tests the consistency of a Web publishing rule between the published server and ISA Server.
3. Traffic Simulator Simulates network traffic in accordance with specified request parameters, such as an internal user and the Web server, providing information about firewall policy rules evaluated for the request.
4. Diagnostic Logging Viewer Now integrated as a tab into the Management console, this feature displays detailed events about the status of your ISA Server computer, as well as configuration and policy issues.
5. NLB Multicast NLB now supports all three modes, Unicast, Multicast and Multicast with IGMP.
6. Cross domain KCD Kerberos Constrained Delegation (KCD) now works in both cross-domain and cross-forest trust environments.
7. SAN certificates Improved support for certificate with multiple SAN entries.
8. Filter RPC by UUID Supports filtering for RPC traffic by UUID for an access rule. Previously, an access rule to RPC traffic would not be restricted by RPC interface UUID.
9. Monitor virtual memory A new event has been created that monitors the virtual memory of the WSPSRV process.

There are more in SP1 but i believe these are the most important ones.

When i look at this it is almost more interesting then the one we could see as news in RTM of 2006 when we compared it to 2004 SP2 (and later SP3).

Ones again… To all of you in the ISA team… Congratulations,nice work!