How to upgrade/migrate from CLM to FIM is totally undocumented by Microsoft. In this article I will tell you what I have learned about this process during my latest customer projects.
First of all we need to state a fact.
There is no way to upgrade from CLM to FIM, you migrate!
This official answer can be read at the FIM FAQ. “Upgrading from CLM to FIM CM is not supported because CLM Feature Pack (FP1) is supported only on 32-bit platforms and FIM CM is only supported on 64-bit platforms. You can export the CLM 2007 database and re-use it in a new FIM CM deployment”
The Process
The basic steps involved in the migration are as follows, later in this article i will tell you the details involved in each step.
- Move the CLM DB to a new FIM supported SQL
- Upgrade the DB to FIM Schema
- Install FIM
- Run the configuration wizard in FIM and use existing DB and Certs
- Migrate certificates used by CLM services, to FIM
- Migrate configuration from CLM to FIM
- Upgrade the CA modules to FIM version
- Configure CA modules
One thing we need to remember is the fact that CLM and FIM CM basically are the same. And both use the same permission and configuration modell described in the picture below.
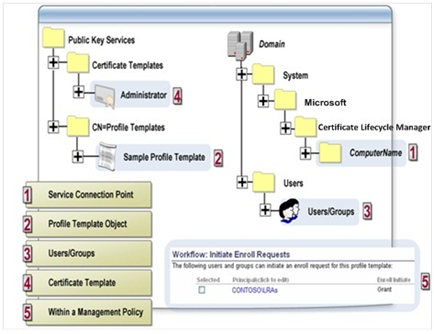
FIM CM Permissions
The permissions are in detail described in Configuring FIM CM Groups, Templates, and Permissions. If we re-use the Service Accounts used by CLM in our FIM CM setup we will be able to re-use the configuration as well in great parts.
Let us now look at the different steps involved and some details around them as well.
Move the CLM DB to a new FIM supported SQL
This is a task for the DB admin. Backup the CLM database using standard SQL backup methods and then restore the Database on a 64-bit SQL 2008, supported by FIM CM.
If you have FIM 2010 Update 1 (build 4.0.3531.2), SQL 2008 R2 is also supported.
I would suggest that you use the same name on the Database as you did before, to minimize the configuration changes required during the migration.
Uppgrade the DB to FIM Schema
On the FIM CM installation media in the folder Certificate Managementx64Upgrade you will find the scripts required to upgrade the database. You run the upgrade.bat with the “new” SQL servername as parameter. Please note that this command needs to be executed on a machine where SQL client software (osql) is installed.
Install FIM
Before you can start the installation you need to make sure the machine has the required prerequisites as described in Installation Requirements, basically the only important stuff is in the section Prepare IIS 7 for FIM CM. We also need to make sure the CLMService account has the correct rights both locally and on the DB. This is described in Configuring the FIM CM Service.
Usually FIM CM setup is split-up to at least 3 servers. FIM CM, SQL and CA. This also gives you some trouble with KCD (Kerberos Constrained Delegation). First of all you need to disable Kernel-mode authentication in IIS, to make sure that FIM CM can use it’s service accounts the way we want them to.
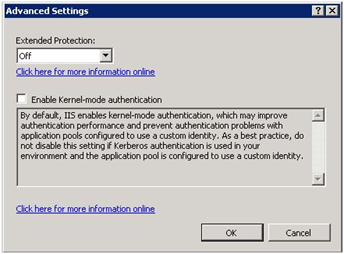 IIS 7 Kernel mode Authentication |
To disable Kernel-mode authentication open the IIS manager and navigate to Default Website. Select Authentication (it’s in the IIS section) in the middle pane, and select Advanced Settings in the taskbar on the right side.Uncheck Enable Kernel-mode authentication |
Installing FIM is no problem, the only setting during the setup you might need to think about is the name of the Virtual Folder in IIS.
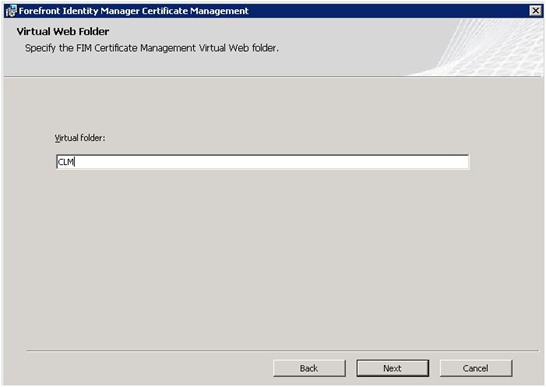 FIM CM VirtualFolder |
By choosing the old name, CLM, instead of the default CertificateManagement, user favorites and systems pointing to the CLM folder will not need to be changed. For that reason you might also consider re-using the old DNS alias and point it to the new FIM CM server, if not you will also need to check your SPN’s and re-check all KCD settings. |
Run the configuration wizard in FIM and use existing DB and Certs
Make sure you upgraded the DB before you run the configuration wizard. The wizard is basically the same as the one in CLM and i will only point out some places in the wizard where you need to pay extra attention.
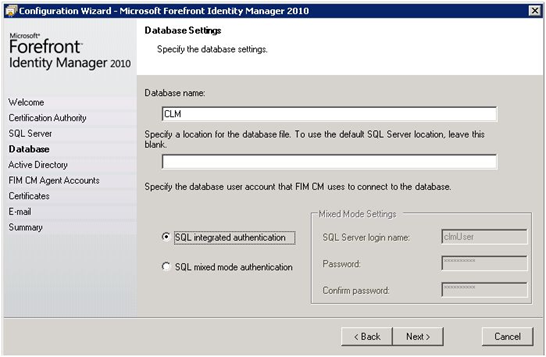 FIM Configuration Wizard DB Name |
The Database name should be CLM since we are reusing the old database. |
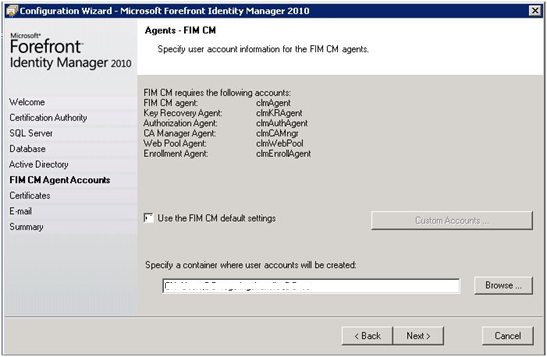 FIM Config Wizard Custom Agent Accounts |
When specifying agent accounts UNCHECK Use the FIM CM default settings and click Custom Accounts… button. |
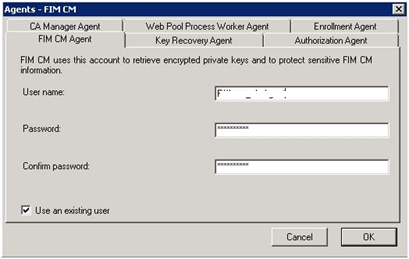 FIM Config Wizard Agents Account Settings |
For each agent account configure the username and password and CHECK Use an existing user |
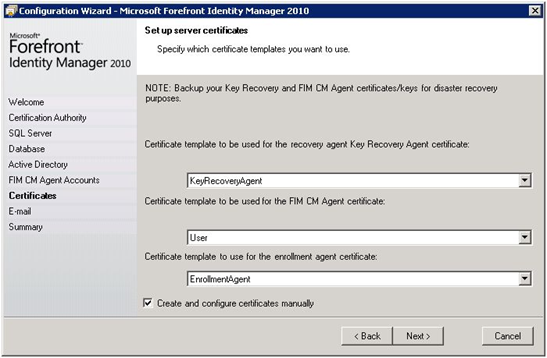 FIM Config Wizard Certificates |
Since we will re-use the same accounts and certifcates. CHECK Create and configure certificates manually. |
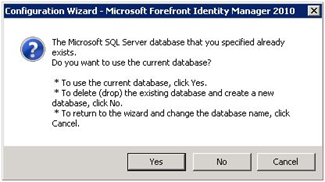 FIM Config Wizard Use Existing DB |
At the end of the wizard you should be notified that the database already exists. Make sure you answer YES to use the existing DB. |
Migrate certificates used by CLM services, to FIM
You need to migrate the certificates used by CLM service accounts to the new FIM CM Server.
The 3 accounts you need to migrate the certificates for are listed below. If you have changed the accounts used in your CLM deployment you need to adjust to that.
- CLMKRAgent
- CLMEnrollAgent
- CLMAgent.
Export the certificates to pfx files from CLM and then log on as each service account and import the certificates into the personal store. Don’t forget the private keys during export/import.
Migrate configuration from CLM to FIM
There are multiple configurations you need to migrate.
First you have the SCP (Service Connection Point) created by the configuration wizard. Check the permissions you have on the old SCP and configure the new SCP with the same settings.
Then you have the config-files. One approach might be to copy all config files from the old CLM to FIM, but I have in my cases migrated the settings in the files instead, since there is no support statement from Microsoft to copy it. This means taking the time to compare the files and copy the changes. In a simple setup the only config file you need to look at is the web.config. In my customer cases I have found that the following keys of the web.config file might have changes.
- Clm.MaxRecords
- Clm.Report.MaxRecords
- Clm.ValidSigningCertificates.Hashes
- Clm.EnrollAgent.Certificate.Hash
- Clm.SmartCard.ExchangeCertificate.Hash
- Clm.RequestSecurity.Flags
- Clm.RequestSecurity.Groups
Since we are re-using the accounts and the database we do not need to make any changes to certificate templates, profile templates or management policies.
Upgrade the CA modules to FIM version
Before we can start using FIM CM we need to upgrade the CA module on the issuing CA used by CLM. Depending on the OS used by the CA you might need to add .NET Framework 3.5 SP1 before installing the FIM CM CA module.
During the upgrade, the CA module will “loose” it’s settings, so before you run the setup make sure you know the settings you would like to use for database connection string and signing certificate.
Configure CA modules
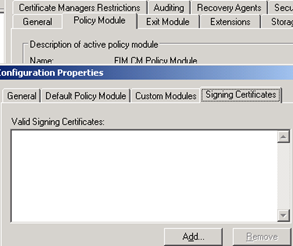 FIM CA Module Signing Certificate |
Two setting are required to be added for the FIM CM CA module before you can use it. First it is the database connection string in the Exit Module and then it is the signing certificate in the Policy Module. |
Hopefully this article has made it a little bit easier for you to understand the steps involved in migrating from CLM to FIM CM. If you have anything to add to this guide please comment.
